How to print your own stickers at home
Printing stickers at home looks trivial until it wastes three sheets. This guide covers the four decisions that actually matter — matte vs gloss vs vinyl paper, the 100% scale rule, A4 vs US Letter, and cutting along the die-cut border — plus the five mistakes that quietly waste whole sheets.
Key takeaways2 min · read this first
- Start with a small pack of matte inkjet sticker paper — learn your printer's behavior before committing to gloss or vinyl.
- Print at 100% scale, every time. "Fit to page" silently shrinks the sheet and drifts every cut line.
- Set media type to labels/heavy and quality to high — a draft-mode print wastes the whole sheet to save cents of ink.
- A4 and US Letter are not interchangeable — download the PDF that matches the paper in your tray.
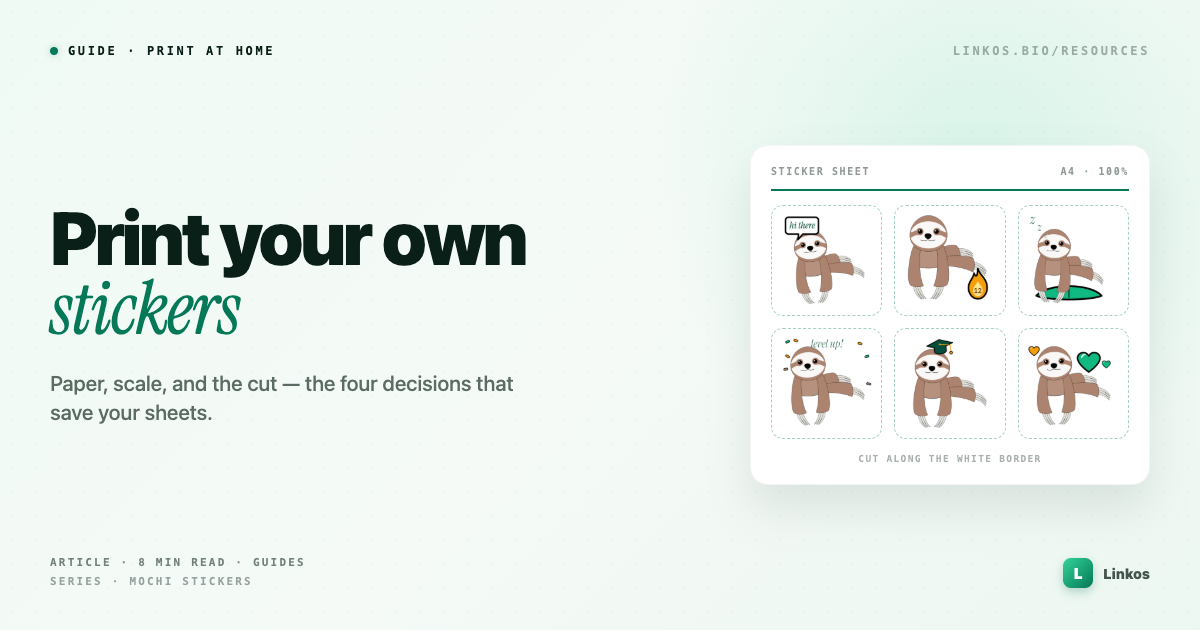
- Cut along the outside edge of the white border — it's your cutting margin, not decoration. The faint gray line marks where it ends.
- Give glossy prints five minutes to set, and rough-cut stickers off the sheet before trimming each contour.
- No printer? The transparent PNGs work in chats as-is, and the SVGs scale to any size without quality loss.
Printing stickers at home is one of those jobs that looks trivial and then quietly eats three sheets of expensive paper before you get one good result. The process itself is genuinely simple — but only if you get four decisions right before you press print: the paper, the printer settings, the scale, and the cut. This guide walks through all four, in the order you'll hit them.
Everything here applies to any printable sticker sheet — ours or anyone else's. Where the Mochi Classic pack does something specific, we'll say so, but the mechanics are universal.
Choose the paper first
Sticker paper is ordinary paper with an adhesive back and a peel-away liner. It comes in two finishes that behave very differently, and the choice matters more than the brand.
Matte sticker paper takes ink cleanly, doesn't smudge, and reads well under any light. Colors come out slightly softer than on screen. It's the forgiving choice — if this is your first sheet, start matte. It also takes pen, which matters if you like labeling things.
Glossy sticker paper makes colors pop and looks closest to commercially printed stickers. The trade-offs: inkjet ink can take minutes to fully set on gloss (touch it early and you'll drag a thumbprint through your artwork), and cheap gloss paper can flake at cut edges. Gloss rewards patience and punishes it equally.
There's a third option worth knowing about: vinyl sticker paper. It's water-resistant, which is the difference between a sticker that survives on a laptop lid or a water bottle and one that peels into papier-mâché at the first splash. Vinyl costs more per sheet and some home printers handle it grudgingly — check that your printer accepts the sheet thickness before buying a 50-pack.
One honest note on quantity: buy the small pack first. Ten sheets, not fifty. You will waste one or two learning your printer's behavior, and it's better to learn on a cheap small pack than commit to fifty sheets of a paper your printer dislikes.
Printer settings that actually matter
Three settings decide the result. Everything else in the print dialog is decoration.
Scale: 100%, always. This is the single most common mistake. Print dialogs love to default to "fit to page," which silently rescales the sheet — usually shrinking it 3–6% to respect printer margins. On a document that doesn't matter. On a sticker sheet where the cut lines are designed at exact physical sizes, it means every sticker comes out slightly smaller and any cut guides drift off their marks. Find the scale setting, set it to 100% (sometimes labeled "actual size"), and check it every single time, because some drivers reset it.
Paper type: tell the printer it's printing on something heavy. Set the media type to "labels," "heavy," "matte photo" or the closest equivalent your driver offers. This slows the feed and adjusts ink density. Skipping it is how you get banding, smears, or a sheet that jams halfway.
Quality: high, not draft. Sticker sheets are small-batch, high-value prints. The extra ink cost of high quality is cents; a muddy draft-mode print wastes the whole sheet.
If your sheet includes a page footer with the intended dimensions — the Mochi Classic sheets print "A4 210 × 297 mm" or "US Letter 8.5 × 11 in" at the bottom — measure it after your first print. If the footer text is there and the sheet edge distances look sane, your scale is right.
A4 or US Letter
These two paper sizes are close enough to look interchangeable and different enough to ruin a print. A4 is narrower and taller; US Letter is wider and shorter. A sheet laid out for one, printed on the other at 100%, clips content on one axis.
The fix is boring: use the file that matches the paper in your tray. Good printable packs ship both versions — the Classic pack includes one PDF per size, and you should download the one that matches your region's paper, not the one that's listed first.
Cutting: the part everyone rushes
Home-printed stickers are almost always kiss-cut by hand — you cut around each sticker's border with scissors or a craft knife, leaving the shape intact.
The white border around each sticker isn't decoration. It's your cutting margin. The rule: cut along the outside edge of the white border, not tight against the artwork. The border exists so your hand doesn't need to be surgical — a wobble inside white space is invisible; the same wobble through the artwork is permanent.
Some sheets print a faint gray line hugging each sticker's silhouette (the Classic sheets do). That line marks where the white border ends. Cut on it or just outside it — it either disappears under the scissors or sits at the sticker's very edge where nobody will ever notice it.
Tools, in ascending order of commitment:
- Sharp scissors handle everything with gentle curves. Rotate the paper, not the scissors.
- A craft knife and cutting mat win on tight interior angles.
- A cutting machine (Cricut, Silhouette) automates the whole thing, but needs the cut path set up in its software — overkill for a sheet or two, sensible if you print stickers monthly.
The mistakes that waste sheets
After the first hundred people print any sticker sheet, the same failures show up. Here's the list, so yours don't:
Printing on the liner side. Sticker paper has a printable face and a peel-off back, and some papers make them annoyingly similar. Mark the top corner of the printable face with a pencil dot when the sheet comes out of the pack.
Handling gloss too early. Give glossy prints five minutes flat before touching. Ten if your room is humid.
"Fit to page." Covered above, but it's the number one waster, so it earns a second mention. 100% scale. Every time.
Cutting immediately, corner to corner. Cut stickers off the sheet as rough rectangles first, then trim each one individually. Trying to cut a finished contour while the sticker is still attached to a full flexing sheet is how corners get clipped.
Laser printers and vinyl. Some vinyl papers are inkjet-only and will warp or worse in a laser printer's fuser heat. Check the pack label for "inkjet" vs "laser" — it's always printed there, and it's the one spec that isn't marketing.
Do you even need to print?
Worth saying: a good sticker pack should be useful without a printer. Digital stickers — transparent-background PNGs — drop straight into WhatsApp, Telegram, iMessage, Notion, and anywhere else an image goes. If a pack ships SVGs as well, you can also scale them to any size for other projects without quality loss.
The Classic pack works this way: twelve PNGs for chat, twelve SVGs for scale, and the two print sheets for when you want something physical on a laptop lid. Print is the bonus, not the requirement.
The 5-minute version
- Buy a small pack of matte inkjet sticker paper (matte first; gloss or vinyl once you trust your printer).
- Download the sheet that matches your paper size — A4 or US Letter, not whichever is first.
- Print at 100% scale, media type "labels/heavy," quality high.
- Wait for the ink to set. Longer for gloss.
- Rough-cut each sticker off the sheet, then trim along the outside of the white border.
That's the whole craft. The first sheet teaches you your printer; every sheet after that is five minutes of scissors and done.
Sign up to start earning XP for every read.